Showing posts with label DIY. Show all posts

Sunday, January 13, 2013

DIY: Pencil Skirts (and here's that new haircut I mentioned!)

Having found a love for pencil skirts and their versatility for creating a professional look while still lending themselves to be colorful, young, and vibrant, I decided it was time to purchase a pattern and start making my own (or, if I'm being honest, putting my mom to work).


The pattern I chose has six different styles of pencil skirts in varying lengths and with a few options of embellishments. The pattern showing the yellow skirt is almost identical to the purple pencil skirt I purchased from J. Crew--it has the same seams, cut, and fit. We used the fabric on the left to create a J. Crew style skirt that I absolutely love. I've worn this skirt with my mustard cardigan and both brown and black tights. 

We used the ruched pencil skirt pattern (middle right) with the fabric shown on the right. It is a silky fabric designed by April Johnston from Project Runway. I decided to actually use this fabric inside out as the pink tone is actually very bright, bordering on neon but the reverse side is perfectly magenta. Paired with grey tights, black wedges, and a black top the skirt is fun and edgy. Thanks mom!


Sunday, January 6, 2013

DIY: Daily Calendar (and have an awesome rest of your school year)

This is a Pinterest-inspired gift I made this holiday season for some of my coworkers, my sister, my mom, and also for our house. I love the idea of taking a moment each day to write down something that happened that day whether it be some momentous occasion or just something you're grateful for that day.


As 2012 drew to a close I realized that I have so much to be thankful for and I know that I don't recognize enough the blessings in my life from the people I'm lucky enough to call friends and family, to my beautiful home, stable job, and my awesome cat! I'd like to take a moment to find the good moments that each day holds ("Everyday may not be good but there is good in every day." Thank you Jen!) and record it. I hope it will serve as a daily reminder to be thankful and to find awesomeness in each day.

"When I get sad, I stop being sad and be awesome instead. True Story." Barney Stinson

I couldn't find any of the berry baskets used in the inspiration pin (original directions here) but found some small white boxes at Michael's that fit 3 inch cards perfectly. I purchased 4x6 ruled index cards and stole the paper cutter from school one night, ok, I actually asked permission, otherwise it would've taken an eternity to cut all those cards by hand with a pair of scissors. In total I made 6 of these sets so here comes so math:
6 sets x 366 days = 2196 cards needed
2196/2 = 1098 cards needed (each large index card was cut in half)
So I purchased 12 packages of 100-cards (extras just in case)
Instead of vintage postcards I purchased scrap-booking paper and card stock. I used spray glue to adhere the paper to the card stock, then cut those on the paper cutter too.

Top Left: Supplies (Aleen's Tacky Spray Glue and Diet Coke were absolutely necessary items)
Top Right: Divider cards made with scrap book paper, spray glue, and card stock
Bottom: Finished product

The last and longest step was to add the dates to all the cards. I decided to purchase metallic pens and hand-write the dates instead of using a stamper. In all I think it probably took close to two hours to create each complete set.

Have an awesome return to school for all the teachers out there! And if your school day is lame, just stop letting it be lame and be awesome instead...

Monday, December 31, 2012

Budget Update--End of 2012

Well, I have just spent the last few hours looking through my closet and jewelry to make a list of everything I have purchased since my last splurge at the outlets in August. As mentioned in that post, I ended up spending through the rest of my October budget and well into my allotted November spending leaving me with a mere $44.32 left for that month and the $70 for December.

So how did I do with my remaining $114.32 for August through December? In two words? Not good. But also not too terribly bad considering that the majority of the purchases I made were less than $15 (rule #3), I did not pay full price for anything I purchased, and I would have been on budget if I got rid of two purchases*.

I am also listing the wonderfully fashionable Christmas presents I received from my wonderful mom and picked out by my stylish sister (second to the last paragraph from my first post).

Here's what I bought!

Old Navy
Dark wash trouser jeans $8.47
Mustard yellow cardigan $18.71
Blue and white polka dot cardigan $19.94
SF 49ers T-shirt $14.63 (this purchase was more for my husband than me...maybe I won't count it in my budget...)

Goodwill
Merona super long sleeve glue gingham collared shirt $3.98
J Crew stretch red paisley collared shirt $3.98

Banana Republic Factory Store
Khaki shorts (for my friends awesome wedding in Mexico!) $6.43

TJ Maxx
Royal purple skinny jeans $14.99

Gap Outlet
Light purple and yellow tissue shirt $6.49
Grey and red floral tissue shirt $6.49

Ebay
White Mountain dark brown riding boots $43.24 with shipping
*These cursed boots!! I knew months ago that I couldn't afford to buy boots and I did it anyway. Yes, apparently I have no willpower. This is one of the two purchases that if I had some self-control I'd have been on budget.

Joanne's Fabric (Post on this DIY project in the coming weeks!)
Pencil skirt pattern, fabric for two skirts (Project Runway Fabric no less!), two zippers $38.37
*Second purchase that if eliminated would have kept me on budget. I do think of this as an investment for the future because now that the pattern has been purchased, I can continue to keep mom in the sweatshop making skirts for next to nothing. Did I mention I have the world's best and most talented mother?

Jewelry (Who am I kidding? They're all necklaces...not a ring, earring or bracelet in sight!)
Gold Leaves and Beads (Old Navy) $9.95
Pink and Yellow Bubble Necklaces (Poke A Dot Shop Facebook Special) $36.98 total
Gold Paddle, Brown Beaded, Purple/Blue/Silver Beaded (Cost Plus) $11.69 for all three as they were buy one get one free and I purchased some for Christmas presents

Christmas Gifts
Camel v-neck sweater, camel ribbon tank, tan pants (The Limited)
Emerald cross-neck long sleeve shirt, Black tissue long sleeve shirt (Ann Taylor)
Gold and brown tiered beaded necklace (Pier One)
Chunky neutral and pink necklace and matching bracelet (The Limited)

Sunday, December 30, 2012

DIY: Wedding Dress Pendant

I am attempting to become more crafty and thanks to my devotion to Pinterest I spent some quality time during my break from school creating home-made gifts for my coworkers, family, and a very special present for my husband.

I had seen this beautiful pendant on Etsy and was instantly in love. You send a small piece of your wedding dress to this jewelry maker and she creates a necklace charm for you and puts it on a beautiful sterling silver chain. The price was a little out of my budget so I decided that I would try to recreate this look myself.

YOUR Wedding Lace Custom Sterling Silver Necklace and Pendant Bridal Gift

A quick trip to Michael's was all it took to find the perfect locket-style pendant and a matching chain. Both items were $5.99 at full price but were on sale for 30%. I also had a coupon for an additional 40% off one item. In total the cost to make my necklace was less than $8 as I already had the findings (jump rings, lobster clasps, and jewelry pliers).

Pendant from Michael's $5.99 full price
It took awhile to find a place on my dress where I could cut a piece of lace without it showing...you know, I'm totally planning on wearing that thing again and/or I'm sure should I ever have daughter she will definitely want to wear it so it really can't have a giant missing square of lace. I eventually found an inside seam that had just enough lace peeking through that I could cut a swatch large enough to fill the pendant. I decided that since this charm is clear on both sides, I also wanted a piece of the beautiful tie my husband wore at our wedding. I cut off the extra piece of fabric on the back of the tie that is used to hold the little end. Below is the finished product! 

lace from my wedding dress

fabric from groom's tie
My husband absolutely loved this gift and said it is his favorite thing he has ever received! I love you honey!
Beautiful Photo from our wedding photographer Courtney Aaron


Monday, August 27, 2012

Pinterest Updo!

I recently joined the wonderful world of Pinterest and have since pinned a few new ways to style my generally lifeless and thin hair. Here is the inspiration photo and how-to guide I pinned about a week ago:


I'm happy to report that it was just as easy as explained and it worked even on my generally challenging locks! It took about 15 minutes from start to finish and the only note I would add to the how-to part would be that I had to put a clear plastic on the end of my little braid while I braided it with the two unbraided strands. When I got close to the end, I slid the plastic band off and used it at the end of the new braid. I did this on all three sets of braids, otherwise I don't think I could've managed braiding with that little braid that kept wanting to come undone.


 I'm also proud to report that with only six bobby pins, this updo lasted all day at school!

Thursday, August 9, 2012

DIY Write-On Frames

Thanks to Pinterest I have found many great ideas for fashion and my classroom. I'm going to leave out how finding these inspirations involve countless hours of me ignoring my husband while I look at "just one more person's boards."

In any case, I loved this idea and ran out to the dollar store at 9:30 Tuesday night to go buy my frames!

Inspiration Frames

I picked an assortment of sizes and laid them out on the floor to see how they would look (don't mind the upside down and sideways happy families).


Then at school I picked out scrap booking paper that matches my color scheme of blues, yellows, and greens to put in the frames. I used the school's paper cutter to make nice clean cuts to ensure a good fit.


And within about a half hour this is what I had!


Frames with Writing in Expo Marker
Here is the final product hung on the wall. I tore off the frame stands on the back of each frame so they'd lay flat against the wall with just a flat push pin.

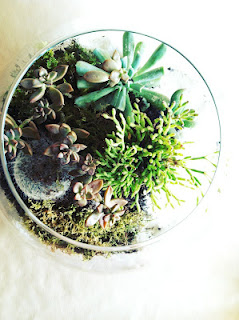
DIY Terrariums

About a month ago I found this awesome DIY project from Mrs. Hahn Daydreams and I have been dreaming about it ever since! I'm terrible with plants and have only managed to keep one plant alive in my entire life...it was a housewarming present from my sister c/o IKEA which means before living with me it lived in a giant indoor warehouse with no natural sunlight or fresh air. I think this is the only reason it is still alive.

The terrarium from the above link is beautiful in a gorgeous glass bowl with a variety of succulents. I liked the idea of succulents (maybe I won't kill them??) but found colorful metal pails for $1 each at Target that seem more 7th grade classroom friendly. I could picture glass shattering within the first week so I came up with something a little less chic but more my speed as far as caring for plants goes.

Inspiration Terrarium

My Version


I made a total of six of these with different plants in each one. The succulents are surrounded by white beans which was an idea I found while flipping through a magazine at my sister's house. I'm not sure how they'll work out as part of me remembers a science experiment when I was in elementary school that involved planting beans like this and watching them sprout. Who knows, maybe if the succulents die I'll have a garden of white beans!

This photo is very poor in quality but it shows the pails in each of my windows. I'm looking forward to trying to keep these cute little guys alive!